To Prepare a Roof for Installation involves 8 essential steps: inspection, material removal, deck repair, surface cleaning, drainage setup, underlayment installation, flashing placement, and safety planning. Professional contractors complete most preparation work, but homeowners can help by clearing access areas and protecting belongings.
What Does Roof Preparation Include?
Roof preparation includes structural inspection, old material removal, deck repair, surface cleaning, and safety setup. The process starts with checking the roof structure’s ability to support new materials. Contractors examine wood decking, metal framing, and concrete surfaces for damage or weakness.
Professional roofers inspect roof decking thickness and attachment plus structural support beams and trusses. They also check existing flashing around chimneys and vents, drainage systems and water flow patterns, plus ventilation openings and attic access.
The inspection reveals problems like water damage, rot, or inadequate support that need fixing before installation begins.
Why Is Proper Roof Preparation Critical?
Proper preparation prevents installation failures and extends roof lifespan by 15-20 years. According to the Canadian Roofing Contractors Association, installing roofing on unprepared surfaces creates contractor liability and system failures.
Preparation prevents water infiltration through damaged decking and structural collapse from inadequate support. It also stops material failure due to improper attachment and code violations requiring expensive corrections.
Statistics show that 33% of homeowners replace roofs due to leaking, often caused by poor preparation during previous installations.
How Do You Inspect a Roof Before Installation?
Roof inspection requires checking structural capacity, surface condition, and drainage systems. Contractors must verify the deck can support the new roof system weight plus live loads like snow and rain.
Structural Assessment Steps
Professional inspectors examine load capacity verification through structural engineers confirming weight limits. They check deck surface continuity for gaps, cracks, or missing sections. Fastener integrity verification confirms nails and screws hold properly. Moisture damage assessment looks for rot, mold, or water stains. Slope measurement confirms proper drainage angles.
Critical Safety Checkpoints
Inspectors document fall protection anchor points and electrical hazards from power lines. They identify structural instability requiring immediate repair plus weather conditions affecting work safety.
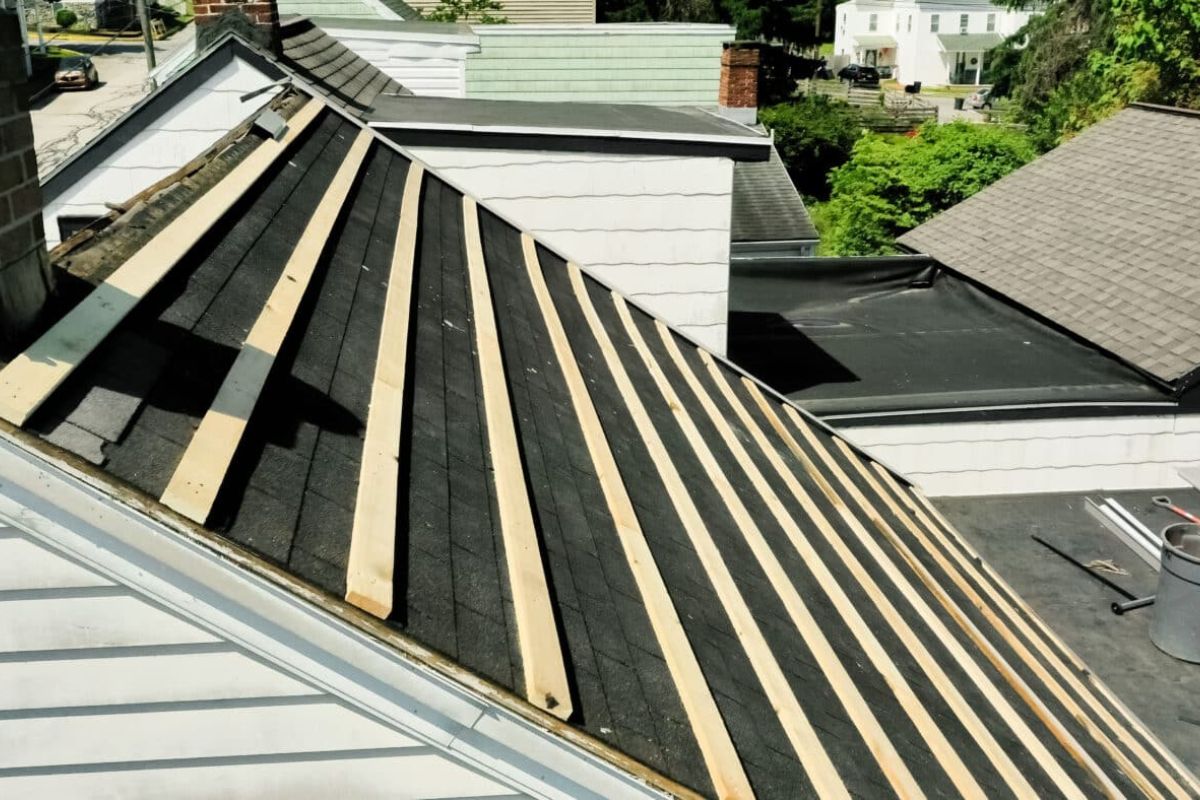
What Materials Get Removed During Preparation?
All existing roofing materials, flashing, and damaged decking get removed completely. The tear-off process exposes the roof deck for proper inspection and repair.
Removal includes shingles, tiles, or metal panels plus underlayment and felt paper. Workers also remove old flashing around penetrations, gutters and downspouts when needed, and damaged or rotted deck sections.
Contractors use specialized tools like roofing spades and pry bars for efficient removal. Complete removal prevents problems with new material installation and allows proper surface preparation.
How Do You Repair Roof Decking?
Deck repair involves replacing damaged sections and securing loose areas with proper fasteners. Wood decks require minimum 5/8-inch plywood thickness for maximum wind resistance.
Deck Repair Process
Workers cut out damaged sections by removing water-damaged or rotted areas. They install new decking using CDX plywood or OSB matching existing thickness. Securing with proper fasteners means 10-penny common nails spaced 4 inches on edges. Checking fastener penetration confirms nails penetrate into roof framing members. Smoothing rough surfaces requires sanding or grinding projections over 1/32 inch.
Material Requirements
Proper decking uses minimum 15.9mm (5/8 inch) plywood thickness and ring shank or common nails for attachment. Spacing requirements include 4-inch spacing along panel edges and 6-inch spacing in field areas.
What Surface Preparation Is Required?
Surface preparation requires complete cleaning, drying, and smoothing before material installation. The deck surface must be continuous, clean, and dry according to industry standards.
Cleaning Requirements
Surface preparation removes all debris, dirt, and old materials while eliminating standing water through pumping or drainage. Workers allow complete drying in all weather conditions and grind smooth any projections or rough areas.
Moisture Management
Contractors address moisture through natural drying time after rain and mechanical drying with blowers when needed. They provide proper ventilation to prevent condensation and vapor barrier installation where required.
How Do You Install Proper Drainage?
Proper drainage requires minimum 1/4-inch slope per foot toward drains or gutters. All flat roofs need positive drainage to prevent water pooling and structural damage.
Drainage System Components
Effective drainage includes roof slope toward collection points and drains sized for maximum rainfall capacity. Systems also need scuppers for overflow protection and gutters with proper attachment and slope.
Water Management Standards
Building codes require minimum 2% slope for conventional built-up roofs and drain spacing based on roof area calculations. Codes also mandate overflow provisions for blocked primary drains and waterproof membrane integration with drainage.
What Underlayment Should You Choose?
Underlayment selection depends on climate conditions and local building codes. Cold climates require self-adhesive ice barriers, while standard areas use 30-pound felt for better durability.
Underlayment Types
Common options include 15-pound felt for basic protection in mild climates and 30-pound felt for enhanced durability and water resistance. Synthetic materials provide superior tear resistance and longevity. Ice barriers offer self-adhesive protection for freeze zones.
Installation Standards
Proper installation requires overlap seams by 6 inches minimum and nail spacing every 12 inches along edges. Workers provide complete deck coverage without gaps and integration with flashing systems.
How Do You Prepare Flashing Areas?
Flashing preparation involves cleaning penetration areas and installing proper sealants before roofing materials. Flashing prevents water infiltration at roof-to-wall connections, chimneys, and vent penetrations.
Common Flashing Locations
Critical flashing areas include chimney and masonry connections plus vent pipe penetrations. Workers also address skylight installations, wall-to-roof intersections, and valley connections between roof sections.
Installation Requirements
Proper flashing requires metal thickness meeting code standards and overlap dimensions per manufacturer specs. Installation includes sealant application at all joints and integration with underlayment systems.
What Safety Measures Are Required?
Safety preparation includes fall protection systems, equipment inspection, and weather monitoring. Falls cause the majority of roofing injuries, making safety planning essential.
Personal Protection Equipment
Required safety gear includes fall arrest harnesses and lanyards plus non-slip footwear with good traction. Workers also need hard hats and safety glasses and first aid equipment on site.
Site Safety Protocols
Safety setup involves ladder placement and securing methods plus work area isolation from public access. Protocols include tool organization and secure storage and emergency response plan development.
How Long Does Roof Preparation Take?
Roof preparation typically takes 1-2 days for average residential projects. Complex roofs with extensive repairs may require 3-5 days for complete preparation.
Timeline Factors
Preparation duration depends on roof size and complexity plus amount of repair work needed. Weather conditions during work, material delivery and availability, and crew size and experience level also affect timing.
Scheduling Considerations
Optimal timing includes dry weather forecasts for 3-5 days and moderate temperatures between 45-85°F. Low wind conditions under 25 mph and adequate daylight hours for safe work are also essential.
What Permits Are Needed for Roof Work?
Most roof installations require building permits and inspections from local authorities. Permit requirements vary by location, project scope, and building codes.
Common Permit Types
Typical permits include building permits for structural work and electrical permits for new wiring. Projects may also need plumbing permits for vent modifications and environmental permits for material disposal.
Inspection Requirements
Code inspections cover structural adequacy before installation and proper material installation methods. Inspectors verify fire safety and building code compliance and conduct final inspection before permit closure.
How Much Does Roof Preparation Cost?
Roof preparation costs range from $2-4 per square foot, included in total installation pricing. The average roof replacement costs $9,191, with preparation representing 15-25% of total project cost.
Cost Factors
Preparation expenses include old material removal and disposal plus deck repair and replacement materials. Costs also cover permit and inspection fees and safety equipment and setup.
Additional Costs
Extra charges may apply for structural repairs beyond normal scope and code upgrades for older buildings. Hazardous material disposal and access difficulties requiring special equipment add costs.
What Property Preparation Is Needed?
Property preparation involves clearing access areas, protecting belongings, and planning for noise disruption. Homeowners should move vehicles, cover landscaping, and secure loose items.
Vehicle and Access Management
Property setup includes moving cars from driveways and garages plus clearing pathways for equipment access. Homeowners unlock gates and remove obstacles and turn off automatic sprinkler systems.
Interior Protection
Inside preparation involves removing wall hangings and fragile items plus covering furniture in upper floors. Homeowners secure valuable possessions and plan for pet and family safety.
Noise and Disruption Planning
Preparation for disruption includes notifying neighbors of work schedule and planning activities away from home. Families arrange pet care during loud work and prepare alternative work spaces.
How Do Weather Conditions Affect Preparation?
Weather directly impacts preparation timing and material installation success. Contractors monitor temperature, humidity, wind, and precipitation forecasts before starting work.
Optimal Weather Conditions
Best conditions include temperatures between 45-85°F and humidity below 85% for material adhesion. Wind speeds under 25 mph for safety and no precipitation in 48-hour forecast are required.
Weather Delays
Work stops during rain or snow conditions and ice formation on surfaces. High wind advisories and extreme temperature warnings also halt preparation work.
What Quality Control Measures Apply?
Quality control involves documentation, material verification, and progress inspections. Contractors photograph conditions, verify material specifications, and conduct checkpoint reviews.
Documentation Requirements
Quality records include before and after condition photos plus material certification and test reports. Documentation covers work progress and completion records and safety inspection and compliance logs.
Inspection Checkpoints
Quality verification covers deck condition and repair adequacy plus material installation per specifications. Inspectors check safety protocol compliance and code requirement adherence.
Professional roof replacement services handle all preparation steps while maintaining safety and quality standards. Expert commercial roofing preparation requires specialized knowledge of building codes and structural requirements.
Proper preparation creates the foundation for successful new residential construction projects. Professional contractors coordinate preparation with other building trades for seamless project completion.